Stronghold of the Faithful
Stronghold of the Faithful

Map of Stronghold of the Faithful
- Levels
- 80
- Type
- Raid
- Within
- Forsaken Thicket
- API
- 1156
“You’ve faced the ghosts of Spirit Vale and uncovered the truth behind Salvation Pass; now the final steps of your journey lie before you. Prepare to enter the Stronghold of the Faithful and challenge the White Mantle in their own territory. Cut through to the heart of their plans, or you and your allies may be lost forever to their twisted magic.
Stronghold of the Faithful is the third raid wing of the Forsaken Thicket raid and is commonly referred to as W3.
The squad leader has been rescued, but this is far from over. Scholar Glenna from the Durmand Priory, who has spent time researching Ley Rifts, was moved by the squad leader's heroism and is leading the incursion into this highly fortified Stronghold. Join her, and discover why the White Mantle is so intent in guarding this place.
Getting there[edit]
Players must own the Heart of Thorns expansion and be in a raid-mode (10 player) squad to join. The raid completion state is based on the player that loads into the instance first (not always the first player who generates the raid pop-up).
- Enter the portal in Verdant Brink (north of Shipwreck Peak Waypoint — or east of Jaka Itzel Waypoint — ).
- Enter the portal at the end of the Salvation Pass raid wing (north-western corner).
- Enter the respective portal in Lion's Arch Aerodrome ( Aerodrome Waypoint — ).
- Enter or be within Lion's Arch Aerodrome when the raid instance is opened.
Scholar Glenna Time to Strike <Character name>, I have troubling news from the Maguuma. Our enemy is entrenched deep within Forsaken Thicket, and from all of my observations, it looks like they're preparing for something. We need to strike now before they have a chance to recover from their defeat at Salvation Pass. Meet me at the designated location as soon as possible.—Glenna |
Locations[edit]
- Points of Interest
- Tunnel of Respite —
- Fountain of Cleansing —
- Zealot's Bastion —
- Twisted Castle —
- Temple of Awakening —
Interactive map[edit]
Objectives[edit]
- Talk to Glenna.
- Escort Glenna to the stronghold's courtyard.
- Glenna

- Turrets secured

- Glenna
- Defeat McLeod and breach the stronghold.
- Defeat McLeod.

- Defeat McLeod.
- Destroy Xera's creation.
- Destroy the Keep Construct.
- Keep Construct

- Time remaining: 10:00
- Keep Construct
- Traverse the Twisted Castle.
- Enter the portal beyond the bell to confront Xera.
- Defeat Xera.
- Xera

- Time remaining: 11:00
- Stay ahead of Xera. Destroy charged bloodstones to manifest ley lines.
- Xera
Walkthrough[edit]
Siege the Stronghold[edit]
- Masteries: Bouncing Mushrooms (required for at least one player), Forsaken Magic (optional), Forsaken Thicket Waters (optional), Glider Basics (required for at least one player), Ley Line Gliding (required for at least one player)
Players must escort and keep Glenna alive as they breach the stronghold. This encounter has no time limit and fails if she dies. Selecting Let's start the mission will begin the encounter and players will remain in combat until its conclusion.
Mechanics[edit]
- Escort
Glenna will have the 15 Surveilled effect. One stack is lost every second if a player is not within range of her. However, these regenerate up to 15 stacks if a player is nearby. At 0 stacks, five White Mantle Seekers will spawn and can quickly kill her.
All players gain the Over Here! special action skill to direct Glenna to their current position. It is recommended for only one player to use this skill to avoid overriding Glenna's destination. This skill can position her away from White Mantle reinforcements that periodically respawn. She will not gain or lose stacks of the Surveilled effect when moving. Glenna must be guided towards towards the white circles to progress.
Mines are laid throughout the stronghold and respawn after a period of time. Each has two regions players can stand in:
- White outline: Reveals the mine, making it targetable and vulnerable to damage.
- Red outline: Detonates and instantly defeating nearby players, including Glenna. Cleansing Fear and applying Stability will minimize the chance players accidentally walk into this zone.
- Towers
A total of five towers must be captured to disable the Bloodstone Turrets bombarding the escort path. Players with the Forsaken Magic mastery can man these turrets to clear out enemies. Bouncing Mushrooms and Ley Line Gliding are required masteries to capture towers, whereas Forsaken Thicket Waters increases survivability during the first segment.
To capture a tower, the number of players within the capture point must exceed the number of enemies. The greater the difference, the faster the tower is captured. There are three main strategies for handling this:
- Portal (Tower Mesmer): A mesmer uses Portal Entre to teleport the entire squad up (except for whoever is supervising Glenna) just long enough to capture each tower
- Solo: A single player captures the towers by themselves. This ideally requires a way to Pull and Knockback all enemies outside of the capture point. Otherwise, all but one enemy should be defeated to prevent additional reinforcements from spawning.
- Group: A small group of people focus on capturing towers. The rest of the group focuses on escorting Glenna.
- Wargs
After each tower is captured, two Warg Bloodhounds spawn: one at the entrance (back warg), and one at the far end of the escort path (front warg). These wargs ignore all players and head straight for Glenna, capable of killing her in 1-2 hits if they reach her. They are unaffected by hard crowd control (CC) effects except for Float; move faster as they get closer to Glenna; and can be slowed with soft CC like Chilled, Immobile, or Crippled. Using hard CC skills on the wargs does not make them run faster. It is recommended to have at least one player stay behind at the entrance to deal with the back warg. The escort group can deal with the front warg as it gets closer.
Event Guide[edit]
Glenna manifests a ley line upon reaching the white circle near the lowered drawbridge. A player must use this to glide across to interact with the lever to raise the drawbridge. Glenna must then be directed to the gate to blow it open, downing any players caught in its blast. This event sequence will not need to be repeated on future attempts.
White Mantle reinforcements will spawn through a red orb. The escort group should progress further into the stronghold whereas the tower group should enter the Tunnel of Respite to capture the first tower. The escort group cannot progress further until the bloodstone turret on the tower is disabled.
Players within the tunnel will be afflicted with Toxic Spores, which reduces healing and deals low damage every second. The Forsaken Thicket Waters mastery allows players to stand in Thicket Waters to temporarily negate the affliction with the Healing Cleanse effect. A minimum of three Thicket Waters is needed to navigate past the mushroom and White Mantle enemies. The group will then need to climb the nearby cliff and glide over to the Bouncing Mushroom, which will launch them onto the tower.
Once the tower is captured, a ley line will spawn for quicker access to the first tower. The escort team should continue moving forward until either the front or back warg gets close or they reach another impassable area due to the tower above.
McLeod the Silent will spawn upon capturing the fifth and final tower. Glenna can no longer be assassinated when her Surveilled stacks drop to zero and can thus be left behind, despite her dialogue. Players will also lose their Over Here! special action skill until he is defeated.
McLeod the Silent[edit]
- Health: 768,930
Mcleod periodically teleports to the furthest player. Otherwise, his main attack resembles the mesmer's Blurred Frenzy and rapidly applies Confusion. Additionally, Warg Bloodhounds will spawn through the gate during the fight and will kill Glenna if they reach her. It is thus recommended for all players to quickly stack near the gate to lure the boss over there. The entire encounter must be redone if Glenna dies or all players are defeated.
When he reaches 75%, 50%, and 25% health, he disappears and summon two clones with the same attacks. Each clone has either Crimson Attunement or Radiant Attunement. All players will gain a random attunement (denoted by the effect and ![]()
![]() overhead indicators) and can only damage clones of the same attunement.
overhead indicators) and can only damage clones of the same attunement.
McLeod returns upon defeating the clones and summons a Warg Bloodhound from the nearby gate.
Once McLeod is defeated, players can direct Glenna to the gate to blow it open and complete the encounter.
Keep Construct[edit]
- Health: 55,053,600
- Enrage Timer: 10 minutes
- Enrage Effect: Enraged — Increases damage dealt by 200%.
- Fixation Mechanic: Highest toughness
- Masteries: None
Keep Construct (Boss)[edit]
The Construct will follow and direct its attacks onto the player with the highest toughness. It has an unusually large health pool that is compensated with stacks of massive damage vulnerability upon succeeding certain mechanics.
- Boss Mechanics
- Gaining Power - The Construct gains a stack every minute, each increasing its damage.
- Xera's Embrace - Defeating a projection will create a large green circle. If the Construct is within the circle, it loses one stack of this effect.
- Tower Drop - The Construct tethers to a random player then leaps to them after delay later, knocking down players on impact.
- Phantasmal Blades (below 75%) - The Construct channels a small portal-like circle at its base. It then alternates slamming its arms down on the ground and creating a blade that slowly revolves around it.
- Players standing in the portal or hit by the blades will gain Confusion (faster if they are in the portal). There are small gaps in between each blade where players may stand and safely deal damage.
- This attack will gain an additional blade every 25% health the Keep Construct loses, capping at three blades.
- Hail of Fury (below 33%) - The Construct leaps into the air, becomes untargetable, and drop debris onto the arena, Stunning players on impact.
- Xera's Embrace can still be removed by killing projections on top of where it was before it leapt away.
Mesmer Projections[edit]
- Health: 378,576
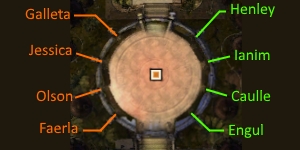
8 of the statues that ring the arena walls will light up, shatter and spawn projections over the course of the fight; at most one statue from either the east or west sides will spawn at a time and it will re-form once its projection is destroyed. Each projection, upon spawning, will immediately fixate on a player and begin walking towards them.
- Each projection will have a large white circle around them; if a projection enters the circle of another, they will both stop whatever they were doing and start slowly walking towards each other. When they meet, they will merge and form an Insidious Projection.
- When a projection is destroyed, it will spawn a green circle (around half the radius of the white circle). This green circle will will remove a stack of Xera's Embrace from the Keep Construct.
Each statue will spawn one of eight different projections: Galleta the Persistent, Henley the Tremulous, Engul the Calculating, Jessica the Benevolent, Olson the Elder, Ianim the Architect, Faerla the Fastidious, or Caulle the Vociferous. All 8 projections share the same attacks that do minor damage.
- Spawn Schedule
- One projection will spawn from each of the two sides 20 seconds into each of the 3 main phases.
- Once a projection is destroyed, a new projection from the same side will spawn after 20 seconds.
- Statues will light up 8 seconds before they shatter and spawn their projection, giving plenty of advanced notice to get in position.
- All projections (except insidious ones) will despawn at the start of the Magic Blast phase.
- Player Effects
- Fixated - Once they spawn, projections will immediately fixate on one player, indicated visually by a white tether connected to the player and by a system message received by the fixated player stating that "You have been fixated."
- If there are multiple projections then they will each choose a different player, usually either right next to the other fixated player or bisecting the stream created by the other projection.
- The player the Keep Construct is aggroed on will not be fixated unless they are the last player alive.
- Several times throughout the fight the Keep Construct relinquishes aggro. Whenever this happens that player is eligible for fixation by projections.
- If a fixated player goes down, the phantasm will immediately switch to another valid player.
- The Keep Construct may switch aggro to another player that is already fixated by a projection. If this happens the projection simultaneously fixates on a different target unless no other target is available.
- Incoming! - Keep Construct targets one player to jump to. The player with the effect also gains a red beam connecting them to the boss during the effect.
- Insidious Projections
- Health: 3,785,760
Insidious Projections will do large amounts of damage and corrupt boons, turning them into conditions. The Insidious Projection has more health than normal projections, making them more difficult to kill. It will not remove a stack of Xera's Embrace even if it is killed. Many groups will choose to reset instead of dealing with them.
Phase Mechanics (Keep Construct)[edit]
| Phase | Objective | |
|---|---|---|
| Cycles through the following phases in order until the Keep Construct is brought down to 66% or 33% health at which point it transitions to the Magic Blast phase. | ||
| Initial | Kill projections on top of the Keep Construct to remove stacks of Xera's Embrace
| |
| Defiance Bar | Break the Keep Construct's defiance bar
| |
| Core Exposed | Station 2 people on each of the 3 circles when they disappear
| |
| Ley Rifts | Push the core through the rifts to accrue stacks of Compromised on the Keep Construct
| |
| Core Retrieved | Deal damage to the Keep Construct
| |
| The Keep Construct was brought down to 66% or 33% health. Upon completion, resumes at the Initial phase. | ||
| Magic Blast | Prevent Xera's energy orbs from reaching the Keep Construct
| |
- Initial Phase
The goal of this phase is to kill projections on top of the Keep Construct to remove stacks of Xera's Embrace. Once both stacks are removed, the Keep Construct will gain a Defiance bar, which should be broken in order to start the Core Exposed phase.
During this phase, the Keep Construct has two possible mechanics that it will choose from randomly:
- Xera's Fury - All players will have a large circle spawn around them, with a red circle emanating from the center. Once the circle is fully red, each player loses 20% of their maximum health for each circle they are standing in (including their own circle).
- Tip: It is recommended for all players, except the tank and one of the fixated players, to spread out. This is to allow the projection to strip a stack of Xera's Embrace if it gets killed. Players who spread out are recommended to continue attacking the projection at a range.
- Radiant/Crimson Phantasms - The Phantasm attack will spawn multiple Radiant and Crimson Phantasms around the arena. All players will be given either Radiant Attunement or Crimson Attunement and must kill all phantasms they are attuned to.
- If there are any phantasms still around 15 seconds after spawning, they will explode and deal a massive amount of damage to all players.
The above two attacks may be interrupted by breaking the Keep Construct's Defiance Bar, if it is available, removing the need to do any of the mechanics required for it. (i.e. the phantasms will disappear and the time bomb circles will dissipate.)
- Core Exposed Phase
The Construct's Core is exposed. Deny Xera's phantasms from protecting it.
Once the Keep Construct's Defiance Bar is broken, it will start to rise into the air and evade all attacks for a few seconds. Shortly after, three invulnerable Xera's Phantasms will spawn, and create a green circle around them that will slowly shrink. A minimum of two players must stand in each circle, or else the Keep Construct returns to the center of the arena, invulnerable, and kills all players, forcing the fight to be reset. Players should continue standing on the circle until after the next phase starts, as leaving the circle too early may trigger the aforementioned scenario.
During this phase, projections will continue to spawn. Players should avoid dragging a projection across the arena to the opposite side, as that is where the next projection will spawn, allowing them to easily merge. Players that are not on a circle should continue focusing down these projections as they spawn.
- Ley Rifts Phase
Collide the core with unstable ley rifts.
If the previous phase was completed successfully, the arena will be surrounded by a red ring and five Unstable Ley Rifts will spawn around the inner edge. The Construct Core will then spawn in the center and Retriever Projections will spawn around the arena. This phase will end prematurely if a Retriever Projection picks up the Core. The Retrievers have a Defiance Bar which may be broken to stun them for a short while. The red ring will do a moderate amount of damage to any player standing in it.
The Core must be brought to the unstable rifts. For each rift the core touches, the Keep Construct will gain one stack of Compromised during the next phase, which increases the damage taken by 75%, up to a total of 375% if the Core was brought to all five rifts. The Core may be Pushed, Pulled, or Launched into each of the rifts. If these effects are not available, a player may attack the core to push it a short distance. (Cooldown: 1 second) Moving the Core into the outer red ring will cause this phase to immediately end. Player pets, minions or illusions cannot push the Core.
The Projections summoned by the statues will continue to spawn in this phase and should be dispatched quickly. It is recommended to bring them to the center to avoid inadvertently hitting the Core, which may knock it out of the circle. If the core gets close to the red area, it can be pulled away or a player may go into the red area, temporarily, to knock it back towards the next rift.
- Core Retrieved Phase
The Construct's core has been retrieved.
Once the core has been brought to all five rifts, retrieved or knocked out of the arena, the Keep Construct will return into the center of the area. During this time, the Keep Construct will be Stunned and knocked down. The damage multiplier depends on how many stacks of Compromised it has. The buff stays for 20 seconds. Players should try do as much damage as possible during this phase.
If no rifts were obtained in the previous phase or the effects of Compromised wore off, then the Keep Construct will start attacking players shortly afterwards. The Keep Construct will have regained both stacks of Xera's Embrace at the start of this phase, though any projections killed on top of it will have continued to remove stacks. Players will need to remove all remaining stacks of Xera's Embrace and restart from the initial phase until the conditions for the next phase are achieved.
- Magic Blast
The Keep Construct is attracting energy to unleash Magic Blast.
Once the Keep Construct is brought down to 66% or 33% health, it will start channeling its Magic Blast attack and gains Xera's Boon which will make it invulnerable for a while. Any projections still remaining will disappear and additional ones will not spawn during this phase.
Crimson and Radiant Energy (red and white orbs) will start spawning around the edge and slowly gravitate towards the Keep Construct. Players will then gain either Crimson Attunement or Radiant Attunement and must intercept each orb before they reach the Keep Construct. Each orb that gets absorbed will grant the boss one stack of Magic Blast Intensity (caps at 35 stacks), which will increase the damage the Magic Blast attack will do. Intercepting an orb of the same color will deal a small amount of damage to the player and absorb the orb. Intercepting an orb of the opposite color will also deal some damage to the player, but the orb will pass through them.
Players are recommended to spread out as evenly as possible and collect as many orbs as they can. It is not required to stray too far away from the center. Since collecting orbs deal damage to the player, players should constantly heal themselves and others during this phase. The orbs can deal critical damage.
This phase ends after approximately 38 seconds, after which it will release its attack (unblockable), and will resume at the initial phase.
General Strategy (Keep Construct)[edit]
A common strategy is to bring the Keep Construct to one side of the field, under the statue that is lighting up. This allows players to immediately focus down one projection and kill it before the other gets too close. The second projection should be killed as quickly as possible because a new statue will start lighting up on the same side of the field soon after. Then the defiance bar is broken and players spread around the three green circles. Generally the fixated player and the DPS players stay together to cleave down the projections. When the Construct Core appears the designated player should push it through as many Ley Rifts as necessary, and squadmates can help to speed it up if possible. Then the boss can be damaged until he reaches 66% or 33% health, and players have to collect orbs of the same color they're assigned to.
These phases are repeated until the boss dies.
Challenge Mode[edit]
The only difference is that a red ring area of effect appears on the outer edge of the arena that constantly deals some damage to anyone standing on it and applies Spatial Denial. Players should be more mindful of Mesmer Projections management so that they don't merge into Insiduous Projections.
Twisted Castle[edit]
- Masteries: Forsaken Magic (optional)
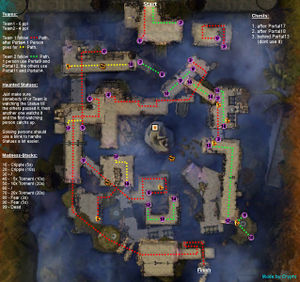
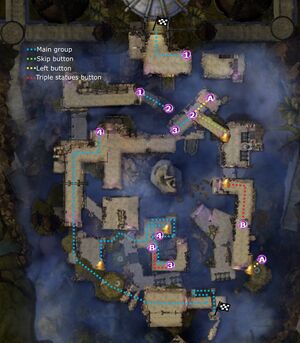
This maze-type encounter requires at least one player to reach and interact with the final door at the end of the maze. It begins once players kill the 3 White Mantle enemies down the stairs leaving the arena from Keep Construct.
- The Maze
The Twisted Castle is a three-dimensional encounter composed of floating platforms at different altitudes. Because gliding is disabled, players must instead traverse the area through one-way, pink-purplish teleport gates. Additional shortcuts exist where some platforms can be reached by falling down or using mobility skills. Traversing the maze is further complicated by inactive teleport gates, stone doors, and buttons.
Inactive teleport gates, indicated by stone arches, can be activated upon defeating all enemies on the platform. Interacting with teleport gates takes priority over interacting with portals, so player portals should be placed further away.
Stone doors physically impede players and can only be opened by standing on the corresponding button, denoted by a ground pattern and beam of light when activated. There are a total of 7 door-button-pairs in the encounter. The final door of the maze is unlocked when at least 5 out of the 7 total buttons are activated.
To the right is a map with the intended way, and another with using specific skips to avoid a significant portion of platforms and doors.
- Madness
Players gain a stack of Madness every five seconds during this encounter, indicated by a temporary overhead black demonic head with red eyes that lingers for a few seconds whenever a stack of madness is gained. Additional madness can be gained actively at a rate of 1 stack every second while the character (not the player's camera) is facing the central rotating spire. Different effects happen when reaching certain Madness stack thresholds:
| Number of stacks | Effect | Visual Icon |
|---|---|---|
| 10 | Crippled (5 seconds) | |
| 20 | Crippled (10 seconds) | |
| 30 | Damage: 5000 (Only if facing the rotating spire.) | Silver |
| 40 | Torment (5 stacks for 10 seconds) | |
| 50 | Torment (10 stacks for 20 seconds) | |
| 60 | Damage: 10000 (Only if facing the rotating spire.) | Gold |
| 70 | Torment (20 stacks for 20 seconds) | |
| 80 | Fear (3 seconds) | |
| 90 | Fear (5 seconds) | Red |
| 99 | Instant defeat |
Players that have the Forsaken Thicket Waters mastery can interacting with Fountains throughout the Twisted Castle. [verification requested] Choosing to "Dip your hands into the water." will remove 10 stacks of madness. "Drink the water." will grant temporary immunity to stacking additional madness from having the character face the rotating spire but will not prevent passive madness gain. The player's choice only takes effect after manually closing the dialogue window with the fountain by choosing "Leave."; walking away without doing so cancels the selection.
Most teleport gates have the user face the rotating spire after the teleporting to incur additional madness. Players should always second-guess their character's facing direction after teleporting to avoid stacking madness to dangerous levels.
- Haunting Statues
Throughout the Twisted Castle, players will encounter Haunting Statues, either alone or in groups. These statues have extremely high toughness and health pool; as such, attempting to destroy them is not recommended.
Haunting Statues have very high movement speed and will rush towards a random player at high speed, trying to attack them with skills similar to the White Mantle Knights found in the raid wing. If a character (not a player's camera) faces one of these statues, the statue freezes and cannot attack nor move due to its Creeping Pursuit effect. Characters that are knocked back, knocked down or jumping are not considered as facing the statue. In extreme cases even dodging may briefly interrupt the immobilization.
Any player entering the red area of effect at the statue's feet will instantly be teleported to the start of the maze.
A common strategy for dealing with these statues is to have one person hold the statue in place while the rest of the group runs by. One of the players having ran by the statue then turns around and faces the statue in order to allow the initial squad member to join the rest of the group. Alternative options include utilization of Immobile with long durations as Haunting Statues are not defiant or different flavors of group Stealth to avoid detection in the first place.
Making it through the maze without being caught by a statue awards the Evasive Maneuver achievement. Eligibility may be tracked via the Achievement Eligibility: Evasive Maneuver effect.
- Fake Floor
If players do not follow the walkthrough below, they might wander into a room with "fake floor". Fake floor panels have a slight distortion effect applied to them, most noticeable near their edges. If players step on them, they will fall through the floor to their deaths.
- General strategy
The most common way to approach the encounter involves certain skips that make it faster and easier to complete, in which the squad sticks together throughout the entire encounter and 1-3 players split from the main group to activate certain key buttons.
| Step | Map | Skip PoV | Description |
|---|---|---|---|
| Main group 1 | 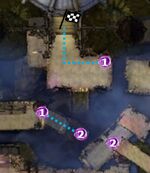
|
(none) | Defeat all White Mantle enemies on the first platform to start the encounter. Take portal 1 to the left, cross a short corridor into portal 2, and defeat all White Mantle enemies. At this point, the group splits. |
| Skip button | 
|

|
One player crosses the gap to the platform below, marked in the map with a green path, using a long leap skill such as the elementalist's Ride the Lightning, ranger's Ancestral Grace, or mesmer's Mirage Thrust, among others. They activate the button (1), and walk into the Haunting Statue's AoE to get teleported to the start. |
| Left button | 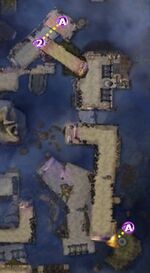
|
(none) | One player takes portal A, activates the button (2), and takes the next portal to return to the start. |
| Main group 2 | 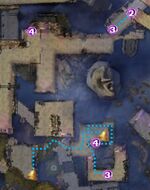
|

|
The main group takes portal 3 into a square bracket island and kills the White Mantle enemies. They walk to the western portal and, without taking the portal, stand on the edge of the platform and dodge forward to land on top of the arch. A normal jump or a dodge-jump will result in enough fall damage to fully kill the player. In many groups, a mesmer can dodge onto the arch, take the fall damage themselves, then use Portal Entre to safely transport the group down. On the platform below, all White Mantle enemies must be defeated while being mindful of the three Haunting Statues. There is a button (3) down the stairs, and another button (4) on the room across. Then, they take portal 4, the one they fell onto moments ago. |
| Triple Statues | 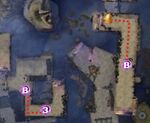
|
(none) | One player, normally one who did either the "skip" or "left" button, goes to the square bracket island and takes the western portal B. They run past the statues, activate the button (5), and take the portal to go back to the start and rejoin the group. Mobility skills or Stealth help get to the button quickly and safely. Shortcut: Jump onto the tip of the rubble near the locked door, onto the door arch, then onto the ground past the door. |
| Main group 3 | 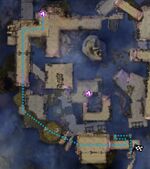
|
(none) | The main group reaches a platform with Haunting Statues and White Mantle enemies that do not need to be killed. The nearby door unlocks when 5 buttons are activated. Players must then rush to the end of the Twisted Castle, avoiding the statues and White Mantle enemies, and interact with the bell atop the stairs to end the encounter. |
| Rewards | 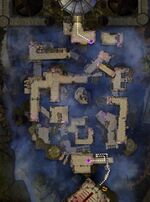
|
(none) | A chest spawns at the end which contains the Legendary Insight that can be autolooted if the player unlocked the corresponding mastery and is alive within range when the encounter finishes. It might not show on the screen that it has been looted, so checking the inventory or the chat log is recommended. For those who were not able to autoloot this chest, they should go to the start by taking a Ley Rift to Travel to the Twisted Castle, then take the middle portal shown in the map and interact with the unnamed chest. |
Xera[edit]
- Health: 22,611,300 (goes up to 25,560,600 after 50%)
- Enrage Timer: 11 minutes
- Enrage Effect: Enraged — Increases outgoing damage
- Fixation Mechanic: Highest toughness
- Masteries: Glider Basics (required), Ley Line Gliding (required)
Upon arriving at the Xera encounter, players will be faced with one of Xera's illusions, standing still on a lower platform, taunting the players. Once players destroy this very low-health clone, the Xera fight will begin. It is therefore recommended to only destroy the clone once everyone is ready to start the encounter.
Note that players can walk anywhere on the same platform as the clone with no effect on its status whatsoever. This encounter requires the Ley Line Gliding mastery.
Initial Puzzle and Platform Phase
Once the initial Xera clone is destroyed, ley-lines will appear on both the eastern and western sides of the platform. As the group is expected to clear both sides at roughly the same time, the squad should split themselves up accordingly. Each platform holds a Bloodstone Fragment in the middle of the platform, protected by a dome; both of these must be destroyed to continue.
The first platform puzzle is very similar to the Core Phase in the Keep Construct encounter. Each platform will have three Exquisite Conjunctions, three Unstable Rifts, and 3 un-named orange areas of effects moving around the platform. In order to remove the protective dome from the shard, each Conjunction must be pushed through an Unstable Rift. Pushing a Conjunction through one of the orange AOEs, or pushing them off the edge of the platform, will cause the loss of said Conjunction, and players will need to wait for it to respawn. Once all Unstable Rifts destroyed, players are free to destroy the Bloodstone Fragment. With it destroyed, a ley line will appear, heading southward towards the next platform.
The second platform puzzle consists of three pressure pads and a protected Bloodstone Fragment. If all three pressure plates are stood on at the same time, the protective dome around the shard will be removed, allowing for it to be attacked. Standing on each pad will give a unique effect to each player standing atop it. Regardless of the pad, once the stack is about to reach 11, it will do damage equal to 100% of the player's health. Full health with barrier will be able to stay alive after 10 stacks. The stacks then start over again. As it is rather unlikely that players will be able to destroy the shard in one burn, all 3 players should hop onto their pressure plates at the same time, and on the count of 9 stacks, rotate to one of the other pressure plates. This should be repeated until the shard is destroyed. Each pressure plate's effect is unique so it is safe to rotate in this way.
It should as well be noted that after about 30 seconds from the start of the fight, the first platform will become ensnared in Xera's Ribbons, and after about 60 seconds so will the second. Standing on a platform ensnared in ribbons will yield very high damage onto the players.
With the second platform cleared, a ley line will once again appear, allowing both groups in the squad to gather on the southernmost platform. A few moments later, players will be prompted to glide to a newly-appeared central platform where Xera is present in her human form.
Human Phase
Throughout this phase, the player squad will be fighting Xera in her human form, along with occasionally-spawning White Mantle soldiers, and her floating illusions. With regard to the base attacks of Xera herself, the only attack which players need to be wary of is an attack identical to that of McLeod the Silent, which resembles Blurred Frenzy and stacks a very high amount of Confusion.
Throughout this phase, Bloodstone Fragments will spawn in each of the 12 segments in a clockwise order. Each fragment will have a very wide AoE around it, increasing the stacks of Derangement of each players standing within it. While Xera stands inside a bloodstone fragment AoE she will constantly convert conditions into boons, greatly empowering her attacks and reducing damage taken. One of the tactics is to destroy these fragments as they spawn and have the player with the highest toughness (aka tank) chase after the forming fragments, making sure to stay out of their area of effect. Standing inside their AoE while they are destroyed removes 8 stacks of Derangement if the player has the Forsaken Magic Mastery. The tactic has evolved, and nowadays the tank just has to move to bring Xera to specific positions, ignoring the fragments to maximise the DPS. As for this first human phase, the fragments can be largely ignored unless the group has very low DPS.
Xera will regularly have an active breakbar. While she is in breakbar phase she will randomly send out attacks around her (similar to Vale Guardian) and take greatly reduced damage. The longer she stays with an active breakbar, the faster the next set of Bloodstone Fragments will spawn. Breaking her bar quickly is therefore extremely important.
In addition to the Bloodstone Fragments spawning around the arena, there are three other main mechanics players need to be aware of. The first is a purple beam of light landing in the exact center of the arena, shooting out projectiles. Being hit by a projectile creates a small lifting AoE below the player that generates Derangement stacks.
There is also an attack behaving similarly to the lift mechanic of the Mesmer's Elite skill Gravity Well, in which Xera will cover half of the platform in a red blurry area, every 30 seconds after Xera spawns on the main platform. Players remaining inside will be lifted after a few seconds, taking heavy damage and gaining 25 stacks of Derangement. Patterns may be skipped if they occur at the same time as the special action key attack (see below).
When Xera reaches 75% health, the squad will be prompted with a message saying "<Squad Member> has harnessed ambient magic". The named squad member will receive a special action skill Intervention, which they can cast as a ground targeted area of effect skill. The attack occurs 10 seconds after the prompt and the bubble lasts for 5 seconds. All players must stand within the bubble to receive Intervention as Xera's powerful attack hits the platform. Any players caught outside the bubble will be immediately defeated. If this is active while a half platform AoE would happen, that AoE is skipped.
Once Xera reaches 50% health, she will vanish and players will be prompted to ley line glide to the southern-most platform to continue on to the next phase. Players failing to ley glide to the next platform will fall to their death.
Second Platform Phase
For this phase, players will need to destroy a Bloodstone Fragment on every platform surrounding the main central platform. After a Bloodstone Fragment is destroyed, a ley line will appear between the current and next platforms, allowing players to rotate across all six platforms.
At the start of this phase, each platform, with the exception of the southern-most platform, will be modified randomly into one of many configurations. Although most platform configurations provide no real threat to players, squad members should beware of the occasional configuration in which the ley line ends right in the middle of a wall. If such a situation occurs, players will need to glide either to the left or right to an opening in the wall.
As soon as a player steps on a platform, AOEs will begin appearing on the ground. Although they do not deal significant damage, they do, over time, apply a significant amount of conditions. Additionally, these attacks have the option to daze a player -- an effect which is deadly to a player jumping off of an edge and hoping to glide. As such, it is important for players to be mindful of these attacks prior to them jumping off of the platform, and to be ready to re-deploy their glider should it be forcefully closed due to a daze effect.
Players who fail to glide from the 5th to the 6th platform may attempt to glide to the not-yet-manifested middle, as being inside the main platform when it manifests will place the player in the middle of the platform.
Once all six Bloodstone Fragments destroyed, players will be prompted to once again glide to the central platform in order to continue their fight with Xera.
Human Phase + Second Puzzle Phase
This second phase will behave almost identically to the first human phase in terms of mechanics. The only two noticeable changes in mechanics are that the Bloodstone Fragments now spawn in a counterclockwise order, and that the platform-covering attack will have a new pattern as shown in the image on the right. The cooldown of this attack is shortened to 25 seconds.
At 40% Health, the squad will be prompted with the message "Xera is teleporting squad members to a floating tower". A few seconds later, 5 random squad members (excluding the player with the highest toughness) will be teleported to a platform. They will there have 2 minutes [verification requested] to complete the same core-pushing puzzle as at the start of the fight. Naturally, the puzzle has to be completed as soon as possible; otherwise, the remaining players on the main platform will be cleaved down by overwhelming soldiers and illusions. Additionally, there is a portal available which can be used by only one player to return to the main platform immediately. Usually the main healer will go back to the platform if all healers got teleported. The rest of the players will be returned to the main platform shortly after they complete the puzzle.
At 20% health, Xera will once again teleport players to another platform where they will need to complete the pressure-plate puzzle. Players returning from both puzzles will have the Hero's Return effect, which will shield them from damage they might take from spawning back on the main platform. However, they can still be hit by the projectiles emitted from the purple beam, so make sure to avoid them.
Once Xera is defeated, players will be lifted and dropped down into the Temple of Awakening where players can find Xera's Chest and information on the White Mantle activities.
NPCs[edit]
Allies[edit]
Foes[edit]
- Caulle the Vociferous
- Crimson Phantasm
- Engul the Calculating
- Faerla the Fastidious
- Galleta the Persistent
- Henley the Tremulous
- Ianim the Architect
- Insidious Projection
- Jessica the Benevolent
- Olson the Elder
- Radiant Phantasm
- Retriever Projection
- Xera's Phantasm
- McLeod the Silent (boss)
- White Mantle Battle Mage
- White Mantle Cleric
- White Mantle Cultist
- White Mantle Knight
- White Mantle Seeker
- Xera (boss)
Objects[edit]
- Anvil
- Bouncing Mushrooms
- Cauldron
- Corpse
- Decorative Armor
- Drawbridge Lever
- Fountain
- Hammer
- Ley Rift
- Painting
- Thicket Waters
Books and Journals[edit]
Sculptures[edit]
Inside the Temple of Awakening[edit]
Chests[edit]
- Boss chests
- Hidden chests
Dialogue[edit]
Entering Stronghold of the Faithful:
- <Character name>: We got your message. We appreciate your willingness to help, but are you sure you're up for the mission?
- Scholar Glenna: When Bennett told me about the horrors he endured while in White Mantle captivity, I felt it my duty to assist.
- Scholar Glenna: We'll blast these zealots back into the history books.
- <Character name>: All right. I don't know what'll happen inside, but I'm glad you're with us just the same.
- <Character name>: We'll let you know when we're ready to begin the assault.
Starting the escort:
- <Character name>: We're ready.
- Scholar Glenna: Has everyone made peace with their gods, spirits, deities...or trees? Good.
- Scholar Glenna: I'm carrying a heavy payload and won't be of much use in a fight.
- Scholar Glenna: I can cast spells when absolutely needed, but for the most part you'll need to keep me alive.
- Scholar Glenna: You think you can do that?
- <Character name>: Any volunteers for escort duty?
- <Squad member>: (cough)
- <Character name>: We'll figure it out as we go.
- Scholar Glenna: Shout and I'll follow you. But don't mistake my willingness for blind obedience.
While escorting:
- Scholar Glenna: Lead the way.
- Ordering Glenna (one of the following lines):
- <Character name>: Glenna!
- <Character name>: Glenna, over here!
- <Character name>: I need you here.
- <Character name>: (whistle)
- <Character name>: Come to me.
- <Character name>: On the double!
- <Character name>: Follow my lead.
- <Character name>: Move!
- Glenna's replies (one of the following lines):
- Scholar Glenna: I'm not your puppy!
- Scholar Glenna: I'll follow you.
- Scholar Glenna: Coming!
- Scholar Glenna: Fine!
- Scholar Glenna: Roger.
- Scholar Glenna: Lead the way.
- Scholar Glenna: Grrr!
- Scholar Glenna: On my way.
- If Glenna is too far away from the group:
- Scholar Glenna: Uh, guys? Don't leave me behind!
- Scholar Glenna: Who's there?
- Scholar Glenna: Guys? I think there's someone here.
- Scholar Glenna: I feel like I'm being watched
At the bridge:
- White Mantle Cultist: Invaders at the gate! Ready the defenses!
- White Mantle Cultist: Notify Xera and await her orders.
- <Character name>: Figures we couldn't just walk right in.
- <Character name>: We need to find a way to reach that lever.
Upon interacting with the first ley-line source:
- Scholar Glenna: Protect me. I'm about to try something.
- <Squad member>: What are you doing?
- Scholar Glenna: Getting us across.
- <Squad member>: How did you do that?
- Scholar Glenna: Practice.
After pulling the draw-bridge lever:
- (one of the following lines)
- Scholar Glenna: Nice work! If I ever need a lever pulled, I'll send you a mail.
- Scholar Glenna: Excellent lever-pulling technique. I'm sure the Iron Legion could use someone like you.
- Scholar Glenna: My hero! You really showed that lever who's boss.
- Scholar Glenna: Hurray!
- <Asura female squad member>: Yeah, yeah. Just get the door opened, brainiac.
- <Asura male squad member>: Yeah, yeah. Just get that door opened, brainiac.
- <Charr squad member>: Ever been fired out of a canon, Glenna? I can arrange it.
- <Human squad member>: Are you familiar with the concept of "friendly fire", Glenna?
- <Norn squad member>: Don't quit your Priory job.
- <Sylvari squad member>: I'm sorry. Were you talking again?
- Scholar Glenna: Bomb planted. Cover your ears!
- <Asura squad member>: Ear canals protected!
- <Human squad member>: We're ready!
- <Norn squad member>: Do it!
Upon encountering the first group of White Mantle
- Xera: I want these intruders destroyed.
- Xera: History is being made today, and nothing can get in the way.
- Scholar Glenna: Who was that?
- <Squad member>: Our next target. Pick up the pace, people! We've got a party to crash.
Nearing the entrance of the cave
- (one of the following lines depending on race)
- <Squad member>: The path diverges here. We may want to split into groups and flank the enemy.
- <Squad member>: The path splits here. We may want to separate into groups and take the enemy by surprise.
- <Squad member>: The road splits here. We may want to separate into groups and take the enemy by surprise.
- <Squad member>: There is another path here. We may want to split up and dismantle their defenses.
- Scholar Glenna: Make sure someone stays with me. I need protection!
If Glenna is called to the cave
- Scholar Glenna: I can't breathe. The air's toxic!
Nearing the first two mines
- <Squad member>: Watch your step!
- (one of the following lines)
- Scholar Glenna: Try to destroy the mine, but don't get too close!
- Scholar Glenna: Don't stand on top of the mines! Destroy them from a safe distance!
After the mines
- Xera: Send in reinforcements!
- Xera: Keep them out at all costs.
- Scholar Glenna: She seems particularly motivated to keep us out.
- <Squad member>: Something big is happening inside.
When the tower team secures a tower
- (one of the following lines)
- <Squad member>: Area clear!
- <Squad member>: Area secure!
- <Squad member>: Tower secure!
- <Squad member>: We've secured the tower!
Using a secured tower's bloodstone turret:
- <Squad member>: That will do.[verification requested]
When the ground team clears all enemies
- (one of the following lines)
- <Squad member>: The area is secure. Activate that ley-line!
- <Squad member>: We need a ley-line!
When getting close to the range of an enemy turret
- Scholar Glenna: We're getting destroyed down here!
While fighting McLeod the Silent:
- One of the following:
- Xera: Sacrifice yourself if you have to.
- Xera: Champion, into the fray!
- McLeod the Silent: Your death will bring Him life!
- McLeod the Silent: Your soul for Lazarus!
After defeating McLeod the Silent:
- Scholar Glenna: This is it. Keep watch while I prepare explosives.
- Scholar Glenna: This should be the last barrier in our way.
- Scholar Glenna: Everyone clear? Explosion imminent!
- Scholar Glenna: That went flawlessly!
- <Squad member>: If you say so.
- <Squad member>: Let's head inside.
Entering the courtyard:
- Xera: How dare you set foot on sacred ground.
- <Squad member>: Whatever you're doing here, it's not going to work.
- Xera: Lazarus will lead the White Mantle to rule a new Kryta, and there's nothing you can do to stop His return.
- Xera: You're already dead.
- Xera: Enjoy my creation. It'll be the last you see.
- Scholar Glenna: That's one powerful mesmer right there.
- (If the squad has at least one mesmer, chosen at random)
- <Charr mesmer squad member>: Whatever.
- <Asura mesmer squad member>: She's nothing special.
- <Norn mesmer squad member>: Compared to me? She's an amateur.
- <Human mesmer squad member>: Watch me make her disappear.
- <Sylvari mesmer squad member>: Don't make me laugh.
- <Squad member>: She just slipped up. They may have Lazarus. If so, then the sacrifices at Salvation Pass were meant to heal him.
- Scholar Glenna: Good luck without me!
Upon engaging the Keep Construct:
- (One of the following lines):
- Xera: Collect their bodies, piece by piece.
- Xera: You're nothing but a minor inconvenience.
- Xera: Kryta will be ours again.
Projection spawning during fight with Keep Construct:
- (One of the following lines):
- Xera: Another!
- Xera: My army is limitless!
- Xera: More!
Phantasms spawning during fight with Keep Construct:
- (One of the following lines):
- Xera: Who will die next?
- Xera: What is real? Can you tell?
Xera's Fury during fight with Keep Construct:
- (One of the following lines):
- Xera: Suffer!
- Xera: Endure the pain!
Keep Construct's defiance bar broken:
- Xera: It's no matter. Repairs are trivial.
When the Keep Construct's core is visible:
- Xera: Keep your hands off that!
At 66% and 33% of Keep Construct's health, during buildup for Magic Blast:
- Xera: Blow them to pieces!
Keep Construct gains stack of Gaining Power:
- (One of the following lines):
- Xera: I have limitless power at my disposal!
- Xera: Each second you waste fighting my minions brings us one step closer to His rebirth!
- Xera: You can't win!
All group members die during fight with Keep Construct:
- (One of the following lines):
- Xera: You failed!
- Xera: His return is inevitable.
- Xera: He will be pleased.
While fighting the Keep Construct:
- Xera: Fear my illusions.[verification requested]
- Xera: I've had enough of you!
- Xera: You can't escape!.[verification requested]
Approaching the Saul D'Alessio statue:
- <Asura squad member>: Saul D'Alessio. I guess we have you to blame for all this.
- <Charr squad member>: So this is the founder of the White Mantle. Huh.
- <Human squad member>: Traitor.
- <Norn squad member>: Saul D'Alessio—drunken gambler.
- <Sylvari squad member>: Saul D'Alessio. So you started this mess....
After interacting with the Mursaat Bust:
- <Squad member>: Where do you creatures come from...[verification requested]
- <Charr squad member>: So this is a mursaat? They look like Exalted.
- <Sylvari squad member>: What are you, and where did you come from?[verification requested]
- <Sylvari squad member>: Where do you come from...and why are you here?
- <Human squad member>: Life would have been so much easier if you'd stayed where you belong.
- Scholar Glenna: Way to stick it to the White Mantle, hero.
Throughout the courtyard:
- <Asura squad member>: Judging from the construction, it appears they've been keeping themselves occupied.
- <Human squad member>: Judging from the looks of this place, they've been busy.
- <Sylvari squad member>: Look at this place. It almost defies explanation.
- <Charr squad member>: You can accomplish a lot in a few hundred years of isolation.
Approaching deer illusion(?):
- <Human squad member>: I'll be more impressed when it's a pile of rubble.
Upon entering the adjecent wing of the courtyard:
- <Human squad member>: Such talent. What a waste.
- <Sylvari squad member>: Proof that even the misguided have some redeeming qualities.
After interacting with the Painting:
- <Sylvari squad member>: Strange how a bunch of delusional fanatics can make such interesting art.
After interacting with The Awakening (a book):
- <Character name>: They failed to control Kryta hundred of years ago, but they're still trying.
- <Character name>: Why won't they give up?
Upon entering the Twisted Castle:
- Xera: It seems I underestimated you.
- Xera: But I don't need to destroy you. I only need to slow you down.
- Xera: I'm clipping your wings. Try not to fall to your death.
- Xera: A new era for Kryta begins with the return of Lazarus. Prepare yourselves for his awakening.
- <Mesmer squad member>: There's no way an ordinary mesmer could wreak this kind of destruction. Is she siphoning magic from bloodstone shards?
- <Mesmer squad member>: I really want her toys.
Throughout the Twisted Castle:
- Xera: You're living on borrowed time.
- Xera: I have eyes everywhere.
- Xera: Do you dare to face your fears?
- Xera: I see your every move.
Stepping on first pressure plate:
- <Squad member>: Look for a way forward. This pressure plate just activated something.
?:
- <Squad member>: This is getting slightly creepy.
Dipping hands in fountain:
- <Squad member>: That feels better...
?:
- <Squad member>: Stay away from the statues. They'll teleport you to the entrance.
?:
- <Squad member>: You've got to be kidding me.
- (one of the following lines)
- <Squad member>: Watch your step. Something feels out of place here.
- <Squad member>: Careful where you step. We don't know where these portals go.
Upon reaching Xera:
- Xera: It's time we settled this.
- <Squad member>: My thought exactly.
Approaching Xera (periodically, at random):
- Xera: How does it feel to make it so far only to fail?
- Xera: Your life is mine.
- Xera: Who wants to die first?
- Xera: What are you waiting for?
- Xera: Go ahead-make the first move.
When engaging Xera (sometimes does not occur, seems related to progress on previous pull):
- Xera: The Tyria you know is about to change.
- Xera: And there's nothing you can do to stop it.
Upon destroying a Bloodstone Shard:
- (one of the following lines)
- Xera: You will answer for that!
- Xera: Don't you dare!
- Xera: No! What are you doing?
Upon reaching the middle platform for the first time:
- (one of the following lines)
- Xera: Surrender now, or face an eternity of suffering!
- Xera: Your efforts are meaningless. We won't be stopped!
- Xera: I've waited years for this day to come. No one can stop what I've set in motion.
Upon casting Gravity Well:
- (one of the following lines)
- Xera: Kryta will be rebuilt on your graves!
- Xera: Your death will bring Him life!
- Xera: I'm everywhere. You can't hide.
Upon casting her deadly attack:
- (one of the following lines)
- Xera: My power is limitless!
- Xera: More power!
- Xera: I'll stop at nothing!
During the 50% health intermission:
- Xera: For hundreds of years we have hidden in plain sight, living in your cities, manipulating your politics.
- Xera: Soldiers, farmers, scholars—all swearing allegiance to the cause...all waiting for the moment to strike.
- Xera: Our time is now. We rise from the shadows to claim what is ours!
Upon returning to the platform:
- Xera: He is almost complete.
- Xera: Even if I die, He will live!
When teleporting group members to the other platform:
- (one of the following lines)
- Xera: Bow before Lazarus!
- Xera: Bow before me!
- Xera: Submit to the White Mantle!
While fighting Xera [verification requested]:
- (one of the following lines)
- Xera: Must not... stop...
- Xera: I'll bury you before you can reach Him!
Upon defeating Xera:
- Scholar Glenna: What happened? What did I mi—oh my! I see you've made a mess of the place.
- Scholar Glenna: You shattered the bloodstone shards and caused a ley-rift reaction. That would explain things.
- Scholar Glenna: Congratulations on silencing a high-ranking White Mantle zealot. Not many can say they've done that.
- Scholar Glenna: When you're all done high-fiving and backslapping each other, you may want to head down to the stasis chamber.
- <Character name>: What's in the statis chamber?
- Scholar Glenna: Go see for yourself.
- Scholar Glenna: All I can say is that I think we have a problem on our hands.
After interacting with the Stasis Chamber:
- <Character name>: We caused an unstable reaction when we destroyed the bloostone shards.
- <Character name>: Did Lazarus escape? Or was he killed in the process? What happened here?
After interacting with the Spent Shards:
- <Character name>: These shards are depleted. They're devoid of magic.
- <Character name>: Were they using them to revive the last mursaat?
After interacting with the Barrel:
- <Character name>: All these shards must've been taken from a larger source.
- <Character name>: But what happens when you fragment a bloodstone?
Gallery[edit]
Notes[edit]
- After defeating McLeod the Silent, 3 illusionary animals spawn around the Fountain of Cleansing. They shatter when the player gets near. A Llama appears in front of the Saul D'Alessio statue, a Moose appears in front of the Confessor Dorian statue and a Doe appears between the Saul D'Alessio and Confessor Isaiah statues.
- Occasionally a Decorative Armor statue appears near the Mursaat Bust, behind the left tent.
- This name for this wing was revealed on June 07, 2016 with the Stronghold of the Faithful teaser and was subsequently released on June 14th, 2016.
