The Aetherblade Retreat
The Aetherblade Retreat
- Year
- 1326 AE
- Storyline
- Living World Season 1
- Chapter
- Sky Pirates
- Location
- Aetherblade Retreat
(Kryta) - Level
- 80
- Preceded by
- Aether Investigation
- Followed by
- Case Closed
- API
- 646
|
Loading screen. |
The Aetherblade Retreat is the fifth story step of Sky Pirates, the second episode of Living World Season 1.
Objectives[edit]
- Read the letter from Inspector Kiel.
- Battle through the Aetherblade barracks.
- Head to the secret Aetherblade hideout.
- Meet up with Kiel.
- Take out the door guards.
- Find a way up the barracks.
- Take the teleporter down.
- Aetherblades Killed

- Shut down Frizz's Lab.
- Talk to Kiel to confront Frizz.
- Frizz

- Keep exploring the Aetherblade hideout.
- Defend Kiel as you explore deeper into the Aetherblade hideout.
- Find a way to disable the lightning traps on the bridge.
- Find a way to open the door for Kiel.
- The Aetherblade Retreat
- Talk to Kiel to confront Mai Trin.
- Mai Trin

- Find a way to disrupt Mai's shield.
- Champion First Mate Horrik

- Survive the cannon assault: 0:30
- Debrief with Kiel.
- Complete!
Rewards[edit]
Walkthrough[edit]
Scoundrel's Hovel[edit]
Upon entering the dungeon you will need to swim through a tunnel with mines. The mines will do significant damage and cripple you, so don't get close, stick to the very top or bottom of the tunnel. Once on the other side, players will reach Inspector Ellen Kiel. Players will take the lead and go around the corner to take out the group of Aetherblades. Go through the doorway and take out the next group to reach the electric catwalks.
Electrified Catwalks[edit]
This is the first mechanic to learn. Players that touch the electrified tiles will take a large amount of damage, usually downing them before they can pass. The tiles deactivate in a pattern, allowing players to carefully make their way across (for slower GPUs, "dodge forward" works well). Inspector Kiel will wait behind while you figure out how to turn them off. Wait until a tile is off and pass through each one in turn until you reach the far side. Inside the hut there are three switches. Activate each one to turn off all electrified tiles and Inspector Kiel will catch up with you. Continue up the catwalks, avoiding other electrified tiles, and turning them off when possible.
Breach the Gate[edit]
After the tiles and passing a holo-dancer, you'll reach an area where you need to get past a gate. Several waves of Aetherblades will attack you. This is also where the next mechanic is learned. While fighting, an Aetherblade Cannoneer will be on a ledge firing cannons at the players, creating fire AoE fields on the ground wherever they hit. As the fight goes on, a second cannoneer on the other side will do the same thing. These cannoneers are invulnerable, so defeat all of the gate guards to open it. After a short run you'll reach the gate to Frizz's Lab for the mid-boss fight.
Frizz's Lab[edit]
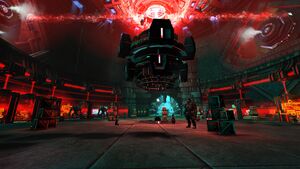
Talk to Inspector Kiel at the console to enter the lab. A cinematic will play showing the area. You'll have a chance to see the area and make plans. Talk to Frizz to trigger the boss fight. He will run around with a Flamethrower while you fight him and his assistants. Once you bring him down to 75% health, he jumps to the center and enters a protective tube. Two laser walls of electricity will emerge from opposite sides of the center tube, dividing the lab area in half, and will rotate counter-clockwise. The walls will do a significant amount of damage if it hits you. Players can either move along with the walls, climb up on the stacks of crates and barrels spread across the room, or even jump over the electric walls if they time it right (this is very difficult, but possible). Teleport skills will safely transport players through them.
- For the Faster Than Light achievement, do not get hit by any of the laser walls during the entire fight. This can be tracked with the Achievement Eligibility: Faster Than Light effect.
You will not be able to damage Frizz during this time, but he will send two Aetherblade Golems at a time to fight you. These golems will be supercharged if the walls pass over them, giving them a damage boost, so avoid being hit while it's in effect. Either kite the golems or soak up their damage. Ranged attacks are best during this fight, although mainly due to mobility since the golems have some ranged attacks too. When supercharged, they can also use a pull skill to bring you close to them.
Once 2 golems have been defeated, Frizz will increase the power, doubling the size of the walls, and send two more golems after you. Players will not be able to avoid these walls by standing on the crates or jumping over, so move counter-clockwise around the room while attacking the golems and try to keep them from being supercharged by the walls.
Once those two golems are defeated, he then activates both the tall and short laser walls at once. The smaller wall is just like the first wall but travels faster than the taller one. Two more golems will fight you during this time. Players will need to again move counter-clockwise to avoid the taller wall, but also jump onto the crates to avoid the smaller one as it will travel faster than you.
Once the third set of golems are destroyed, the fight ends and players can continue.
Due to the fight lasting however long the golems are still alive, it is advised to focus on DPS here to minimize the chance of getting hit by lasers.
The Wretched Walk[edit]
Before going forwards, return from where you came, take the wooden plank up on the right side of the cavern into the hut where you'll find the first aetherblade chest for Asset Recovery.
Go back to the arena, and continue traveling north along the passageway. Take a right into a dead end, kill the inquest there and you will find both an aetherblade chest and Lab Notes, for the Investigative Study 2 achievement. Continue west and follow the path. A storm is picking up, and the rope bridges will get struck by lightning often. Avoid the lightning and cross the bridges to reach the other side. In the middle of the bridge section there will be several Aetherblades. This section is a death trap, as the Aetherblades are powerful and you don't have much room to maneuver. Take them out and continue along the bridges.
After deactivating the console, continue straight to a house where you'll find aetherblade chest 3 as well as the Letter from Ivan. After collecting the chest and the note, go east over the bridge.
Deceit's Climb[edit]
Continue to travel through the tunnels. Inspector Kiel will wait at some closed doors while players work to open them. Travel up and defeat the pirates waiting there to open it up. Before continuing to the docks, follow the path back down (to the door where Ellen was waiting in front of) to find chest number 4. Run back up and continue on to the docks.
Aethership Dock[edit]
There are three optional achievements to achieve this fight. When entering the arena, you can immediately /salute for Don't Be Rude to the Brute. During the fight, if you successfully dodge all of Horrik's barrages you earn Personal Space. Note that for this achievement, Horrik's attacks don't count when you're fighting him. You can track your eligibility for this achievement in game when checking your buffs. Finally, after the fight but before debriefing with Ellen Kiel you can shoot down an airship with the cannon on the docked airship by interacting with it for the Unfriendly Skies achievement.
Talk to Inspector Kiel to enter the boss fight area. After a short cinematic, Mai Trin and Horrik will attack you. Mai has a buff called Captain's Shield, which reduces damage done to her by 10% per stack. She begins with 10 stacks and she must be hit by Horrik's electric fields to remove them. She also shadowsteps around and uses electric attacks and bleeds. Horrik will stand off to the side and fire cannonballs and electric shots at players, creating burning and electric fields. Lure Mai into the electric fields to reduce the Captain's Shield and take her out.
If players focus on Horrik instead and kill him first, Mai will revive him, creating a shockwave (similar to the Molten Berserker from Molten Facility). Reviving Horrik also seems to reset her Captain's Shield. Horrik should be ignored until Mai is down or nearly down. In the last phase of killing Mai, it is reasonable to hit Horrik also so that he is less of a problem when Mai is downed. Mai seems to have several noticeable tactics. She notices who is reviving and attacks them, she targets the character furthest away from her, and probably other tactics that others might add.
Once Mai reaches 75%, she and Horrik teleport away and two cannoneers appear, raining fire down on the players similar to the gate section earlier. The pattern of shots are different each volley, so stay on the move. After about 45 seconds of this, Mai and Horrik appear to continue the fight. This cannon interludes happens again at 50% and 25%, each time adding more cannons (which means more fields) and the volleys happen more often, and the duration is longer also. The first time the cannons lasts for 60 seconds, then 80, and finally 120 on the last phase. Note that the volleys target players, so having multiple players stack up in the same place is not advised, as it will create multiple overlapping fields with no safe place to stand in between. Instead, spread out and simply sidestep the AOEs when they appear. Stealth can also be used to briefly prevent cannoneers from targeting you, but it will not negate any projectiles already en route.
One alternative tactic often used by players is to designate a run leader and stack up moments before the barrage phase (E.G. ~80% or so health on the first barrage and so on). When the barrage phase occurs, the players will follow the run leader closely and run as a group clockwise or counterclockwise around the edges of the room. This method is recommended if the party has a substantial amount of regen/swiftness, as it reduces the pressure on individual players substantially. Downed teammates can be tended to after the barrage phase.
Once Mai is defeated, Horrik becomes frenzied and now you must finish him.
Before finishing the mission, the final chest can be found when entering the docked airship, in the back on a raised platform. The last note for this mission, Scribbled Note from Horrik is also found on the airship. Take one of the ramps to the lower floor and go to the end of the room to find it stuck to the wall.
Talk to Ellen Kiel to finish the mission.
Story and replay checkpoints[edit]
Four checkpoints are available during the story and can be freely accessed afterwards when replaying the episode for achievements:
- Replay Aetherblade Retreat for achievements: Battle through the Aetherblade barracks, starting point of the story instance
- Replay Aetherblade Retreat for achievements: Shut down Frizz's Lab, right before the fight against Frizz
- Replay Aetherblade Retreat for achievements: Keep exploring the Aetherblade hideout, cave exit right after the fight against Frizz
- Replay Aetherblade Retreat for achievements: The Aetherblade Retreat, right before the fight against Mai Trin and Horrik
Achievements[edit]
| The Aetherblade Retreat | Sky Pirates | 1 |
|---|---|---|
| Complete the story chapter The Aetherblade Retreat. | Complete The Aetherblade Retreat | 1 |
- Complete the mission.
| Asset Recovery | Sky Pirates | 3 |
|---|---|---|
| In the story instance The Aetherblade Retreat, plunder all of the Aetherblade chests. |
Discovered 1 Secret Chest | 1 |
| Discovered 5 Secret Chests | 2 |
- Refer to the table below for the five chest locations.
| Investigative Study 2 | Sky Pirates | 1 |
|---|---|---|
| During the Sky Pirates storyline, find and read sources of information on the Aetherblade pirates. |
Lore Located | 1 |
- Lab Notes: After defeating Frizz, take the right fork into the dead end. The note is on a box to the left, across from the Aetherblade Chest.
- Letter from Ivan: After crossing the bridge with the lightning traps take a left through a door (same room as the chest). The letter is on the floor to your immediate left. (This is the 2nd electried bridge, the suspended one.)
- Scribbled Note from Horrik: On the Aetherblade ship at the end of the instance below deck, next to the door.
| Aether Apprehender: The Aetherblade Retreat | Sky Pirates | 5 |
|---|---|---|
| Kill Aetherblades in their hidden lair during the Sky Pirates chapter. | Aetherblades Killed: 1 | 1 |
| Aetherblades Killed: 25 | 1 | |
| Aetherblades Killed: 50 | 3 |
- Simply defeat Aetherblade enemies throughout the mission.
| Faster Than Light | Sky Pirates | 15 |
|---|---|---|
| Complete Kleptotronic Advanced Designs without being hit by lasers. | Avoid Lasers in Kleptotronic Advanced Designs | 15 |
- Achievement eligibility can be tracked with the Achievement Eligibility: Faster Than Light effect on the player's effect bar.
- During the fight against Frizz, don't get hit by any of the rotating laser walls.
| Equipment Failure | Sky Pirates | 5 |
|---|---|---|
| Leave Frizz crushed in his lab. | Defeat Frizz: 1 | 5 |
- Defeat Frizz.
| Don't Be Rude to the Brute | Sky Pirates | 5 |
|---|---|---|
| Show respect by saluting Horrik. | Salute Horrik: 1 | 5 |
- Perform the
/saluteemote in the final boss area. Works before the fight begins or when Horrik is dead.
| Personal Space | Sky Pirates | 15 |
|---|---|---|
| Avoid Horrik's area attacks while fighting him. | Avoid area attacks while fighting Horrik. | 15 |
- During the fight against Mai Trin and Horrik, avoid getting hit by Horrik's cannon fire in the barrage phases.
- Getting hit by his cannon while fighting him or Mai Trin doesn't remove eligibility for this achievement. Getting hit by the cannon attacks from the unreachable Aetherblade Thumpers on either side of the room doesn't remove eligibility either.
| Cornered, Caught, Collared (2013) | Sky Pirates | 2 |
|---|---|---|
| You tracked down and subdued the criminal at large. The Lionguard will take it from here. | Capture the Criminal Behind the Dragon Bash Crime | 2 |
- Defeat Mai Trin.
| Unfriendly Skies | Sky Pirates | 15 |
|---|---|---|
| Use Aetherblade weaponry to bring down the pirate airship. | Aetherblade Airship Destroyed: 1 | 15 |
- Interact with the cannon on the deck of the docked airship. Interacting with the cannon is not possible after debriefing with Kiel.
NPCs[edit]
Allies[edit]
- Various
Services[edit]
Foes[edit]
- Frizz
- Inquest Assassin
- Inquest Assistant
- Inquest Engineer
- Inquest Extinguisher
- Inquest Grenadier
- Inquest Technician
- Veteran Inquest Assassin
- Aetherblade Striker
- Aetherblade Thumper
- Champion First Mate Horrik
- Elite Aetherblade Thumper
- Veteran Aetherblade Thumper
Objects[edit]
- Aetherblade Chest
- Cannon
- Door Control
- Lab Notes
- Letter from Ivan
- Mine
- Scribbled Note from Horrik
- The Trap
Dialogue[edit]
Lionguard Inspector Ellen Kiel Aetherblade Lair Located <Character name>, The Aetherblades have been hiding inside a cave in Lion's Arch this entire time. The scoundrels... I could use some backup for a raid on their hideout. Consider yourself deputized. Head to the base of the waterfall at the Diverse Ledges as soon as you can. I'll meet you there.—Lionguard Inspector Ellen Kiel |
- Optionally talking to NPCs
- Lionguard Inspector Wholley: Glad to have you with us, sir. Inspector Kiel has organized a fast incursion—the two of you will be our point group, and a full cadre of Lionguard will push in to secure the base behind you.
- Good, I'm in the mood to settle this quickly.
- Lionguard: It's an honor to work with you, Commander. Inspector Kiel is just ahead. Those brigands have mined the waters, so swim carefully.
- Got it.
- Approaching Inspector Kiel
- Inspector Ellen Kiel: Let's get going.
- Talking to Inspector Kiel
- Inspector Ellen Kiel: Mai Trin and her crew came through here. I've got a bad feeling about this, but at least you're here too. Let's go.
- I'll take the lead.
- As Inspector Kiel approaches the electric walls
- Inspector Ellen Kiel: Ow! It shocked me!
- Waiting at the electric walls
- Inspector Ellen Kiel: We need to shut that down. You find a way to turn that off, I'll watch your back.
- I'm on it.
- At the console before the Kleptotronic Design Lab
- Inspector Ellen Kiel: Hmmm, let's see what this does.
- Talking to Inspector Kiel to get into Frizz's lab
- Inspector Ellen Kiel: This security panel seems simple enough. Are you ready to breach the room?
- Let's go.
- Not yet.
- Cinematic showing the lab
- Frizz: This is a sterile research environment. Leave at once.
Frizz points at <Character name>.
- After cinematic
- Frizz: Very well. I have ways of dealing with contaminants.
- Talking to Frizz
- Frizz: This is a sterile research environment. Leave at once.
- Let's finish this.
- When Frizz is at 75% health
- Frizz: You're vandalizing previous equipment. Why don't you play with live wires?
- During fight
- Frizz: Time to amplify the power. Fry, you pests. Fry like skritt on a lightning rod.
- Frizz: This isn't supposed to happen. You should be dead by now!
- Frizz: Zap! (laughs) What, you wanted something more pithy? Sue me. I'm new at killing people.
- When someone is downed or defeated
- Frizz: Someone call sanitation. I have stains that need eradicating.
- When all golems are defeated
- Frizz: You think you've won? You've won nothing! Tremble and cry as I unleash my greatest—
- Inspector Ellen Kiel: Have I mentioned how much I hate those grubby little Inquest?
- Talking to Inspector Kiel after the lab
- Inspector Ellen Kiel: I'm shocked—and impressed—that these ruffians kept this place a secret for so long. Let's go. We've still got ground to cover.
- Here we go.
- Talking to Inspector Kiel at the rope bridges
- Inspector Ellen Kiel: We need to shut that down. You find a way to turn that off, I'll watch your back.
- I'm on it.
- At the main doors
- Inspector Ellen Kiel: Don't leave me here. I can help.
- Talking to Inspector Kiel at the doors
- Inspector Ellen Kiel: We have to find a way to open these doors. Look around for a way through.
- Okay.
- After defeating all of the Aetherblade and Inquest
- Inspector Ellen Kiel: Let's end this. Follow me!
- Inspector Ellen Kiel: Oh no. Not another control panel.
- Talking to Inspector Kiel at entrance to docks
- Inspector Ellen Kiel: Behind this door is Mai Trin. Are you ready to face her?
- Let's finish this.
- I need more time.
- During the cinematic
- Mai Trin: Scarlet's gonna have my skull.
- Champion First Mate Horrik: What now, Captain? It'll take cannonballs to get out of here alive.
- Mai Trin: I'm dead either way. Might as well strap in for a decent fight.
- Champion First Mate Horrik: You got it. I'll undock the airships.
- Mai Trin: I'll raise the gangplanks.
- At the start of the fight
- Mai Trin: This is what your curiosity gets you.
- When Mai is at 75%, 50%, or 25%
- Mai Trin: Horrik! Unleash the cannons!
- Horrik: Aye, aye, Captain.
- When Horrik is at 75%, 50%, or 25%
- Mai Trin: No more half measures. All hands on deck!
- When Mai is defeated
- Mai Trin: Enough! You've won. Next time, just ask a little nicer.
- Inspector Ellen Kiel: Lionguard, take our intrepid airship captain into custody. Don't take your eyes off her.
- Lionguard: On it, Investigator.
- Inspector Ellen Kiel: I'm itching to blow that escaping airship out of the sky. Any ideas how to do that?
- Talking to Inspector Kiel after the fight
- Inspector Ellen Kiel: Thank you, Commander. I'll sleep a little easier tonight knowing that Mai Trin is in custody.
- All of Lion's Arch will.
- To think, the Aetherblades were hiding so close that entire time...
- She'll face justice. Don't beat yourself up.
- I won't. I'm headed to Divinity's Reach after I wrap this up, to express my thanks to Delaqua and her assistant. I'm sure Magnus will want to celebrate with an ale. You're welcome to join us.
- Dead End Bar? I know the way.
Books[edit]
My story[edit]

|
|
Notes[edit]
Trivia[edit]
- While most of the dialogue is the same as the original, Mai Trin's lines have been reworded and Ellen Kiel's final dialogue is completely different


