Help:Images
Adding images to the Guild Wars 2 Wiki is a great way to enhance the content of an article, or liven up a userpage. Here are some basics on how to make your screenshots wiki friendly.
Step 1: Graphics settings[edit]
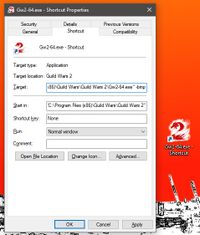
To take the highest quality screenshots, you should capture them in the .bmp format. This is done by adding "-bmp" to your Guild Wars 2 shortcut. See the command line page for "-bmp" notes.
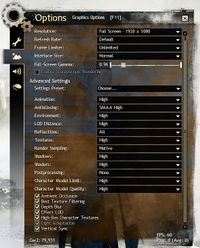
Once ingame, open the Graphics options menu F11, and do the following:
- Select Best Appearance from the settings preset drop-down
- Anti-Aliasing - select the highest available
- Turn off post-processing
- Tick all the boxes at the bottom (includes vertical sync and best textures)
Step 2: Taking a screenshot[edit]
Be aware of which direction the light is coming from when taking screenshots. Ideally you want to take screenshots when facing into the light, rather than into the shadow with the light behind you. (If you haven't disabled shadows, your shadow may also appear in the screenshot when your subject faces the wrong way.) In the case of NPCs, you can talk to them to get them to turn towards a different direction.
When you hover your mouse over the target, they will become illuminated. This is best avoided where possible however this may be useful in particularly dark locations. If your subject also appears in lighter locations (e.g. a dungeon and outside), consider taking the screenshot in a different place. Additionally, some areas are strongly hued and provide additional unwanted colors.
Screenshots are taken with the Print Screen button, typically above the home/insert keys.
Using Shift + Print Screen will hide the game interface during the capture, so you can get a clean shot. You can also toggle the game interface off (and back on again) by pressing Ctrl + Shift + H
Step 3: Preparing the image[edit]
Having taken a screenshot, the file will appear in your documents folder. In windows this is typically:
C:\Users\<Your windows username>\Documents\Guild Wars 2\Screens
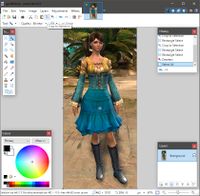
Check that the screenshot turned out as you expected - if not, you might want to retake the screenshot. If you're happy with it, crop the image roughly to the region of interest and save it as a .jpg. You can crop images in any basic image editing software, e.g. Microsoft Paint, Paint.NET or GIMP. See the bottom of the page for links to our recommendations.
Step 4: Uploading the image[edit]
Once you're logged in, there are two scenarios for uploading an image: (1) you're uploading an entirely new image of a subject that doesn't have an existing file, or, (2) you've got a better screenshot than an existing file.
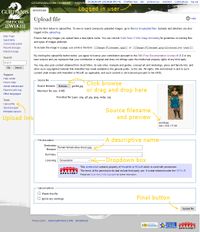
To upload a new image from scratch, visit Upload file (accessible in the Toolbox section of the sidebar). Browse for an image using the Browse button, or drag and drop into the upload form. Then give the file a descriptive name - please don't call it gw123.jpg!
To upload a new version of an existing image, visit the current file page, e.g. File:Dredge Pillar.jpg, scroll down, and click on "Upload a new version of this file". Doing this links to the exact same form as for a new image, but the destination name won't change after browsing for the file.
If it's a new image, you'll need to select "Screenshot" from the dropdown box, and then press "Upload file" to confirm your file submission.
Step 5: Using the image[edit]
The best bit - exhibiting your screenshot on the wiki.
On pages with an infobox (which are templates in the top right corner of a page, found on NPCs, Areas, Items etc), it should autodetect your image if you named it along the lines of "File:<page name>.jpg".
Otherwise, visit a page, click edit, write the following:
[[File:<insert file name here>.jpg|thumb|<insert description here>]]
Use "Show preview" to check you spelt the filename and syntax correctly, and then press "Save page".
FAQ[edit]
- Help! I uploaded a new image but it still shows the previous revision on the file page and/or gallery and/or article or nothing at all.
- This is most likely a cache error and often occurs when the file size is quite large. Waiting helps, but alternatively you can click the clock at the top of the screen or the 'Refresh' button next to 'Watch'. This purges the page cache. Keep in mind that most often you will need to refresh the file page to fix display issues on articles that use the image in question.
- I uploaded an image, but it doesn't show up on the article. What do?
- Did you make sure that you uploaded the file under the right target name? Sometimes when you select an image to upload that has been stored on your pc with a different or generic name (e.g. 'gw001.jpg'), the destination filename switches from the previous correct one (e.g. 'Evon Gnashblade.jpg') to your filename. Similarly, pay attention to the format your uploaded image is in (e.g. .png vs. .jpg).
See also[edit]
- Guild Wars 2 Wiki:Image formatting - Image use policy and the detailed formatting guidelines.
External links[edit]
These free and open source software packages have been recommended by Wikipedia users for use image manipulation:
- Paint.NET [1] — Image editing software based on the .NET platform. (Windows)
- GIMP [2] — General image editor. (Linux, Windows, Mac OS X)


