User:MikaMika/vale-guardian
Vale Guardian is the first boss of wing 1. He appears after three mini bosses, who also appear during the fight. The first three guardians (Red, Blue and Green) appear in a random order and are there to teach the mechanics of the main fight.
What sort of classes do I want to bring here?[edit]
- Damage type: Power and condi (1–2 condi dps)
- Tanking type: Toughness
- Healers: Solo heal or Duo
- Boon thief: No
Markers for side tanking position[edit]
This is most common in pugs or training runs. Speed runs tend to mid tank.
Phases[edit]
Once you've killed the three mini bosses and get to the main Vale Guardian fight, he has three main phases and two split phases.
- Hit the boss—here he comes to the side and you hit him, avoiding mechanics until 66%.
- Split phase—go and kill the mini bosses. The usual tactic is a 2 way split for training runs but 1 way and 3 way also are used.
- Hit the boss—go back to the side and hit him, hopping floors until 33%.
- Split phase—go and kill the mini bosses (like you did in 2).
- Run in circles—starting midway between Red and Green pylons, move the boss clockwise to avoid the floor killing you. Like "Hit the boss" but in circles. KEEP MOVING!
Mini bosses[edit]
Red Guardian[edit]
Red Guardian is a condition damage mini boss. This is the reason that most squads have 1–3 condition damage players. It's their job to kill the Red Guardian. If you are condition damage, you will go to the red pillar during split phases in the main arena.
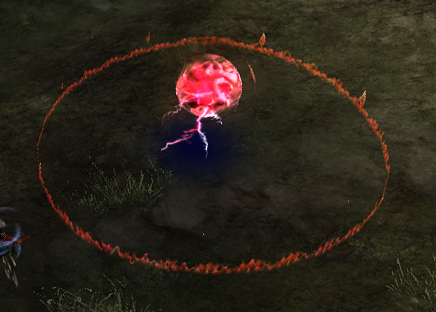
Red Guardian spawns red orbs called seekers. They have an AoE around them (red circle). You do not want to stand in that circle. It hurts.
Usually the druid pushes the seekers away from the group, as the seekers follow players. This is done using Glyph of Tides. The druid often also takes Entangle as their elite skill in order to immobilise the seekers a short distance from the group. This is because Glyph of Tides is not always off cooldown depending on your seeker management and the length of the phases. Remember to only use Glyph of Tides outside of CA otherwise it pulls.
If less confident, the chrono(s) should take focus as their second offhand to help pull the seekers away from the group. Whatever you do, DO NOT PULL THE SEEKERS. Your group will hate you if you do.
| Profession | Slot | Skill |
|---|---|---|
| Guardian | Axe 3 | Blazing Edge |
| Dragonhunter | Elite | Dragon's Maw |
| Guardian | Greatsword 5 on 2nd use (why are you using this twice anyway here?!) | Pull |
| Dragonhunter | F1 skill on 2nd use (see above—why?!) | Hunter's Verdict |
| Chronomancer | Elite | Gravity Well (just bring Time Warp!) |
| Mesmer | Focus 4 | Into the Void |
| Necromancer | Utility | Spectral Grasp |
| Ranger | Axe 4 | Path of Scars |
| Revenant | Axe 5 | Temporal Rift |
| Revenant | Utility | Call to Anguish |
| Ranger | Iboga pet (every 20s to the target) | Fang Grapple |
Handy note: seekers can be affected by epidemic, so feel free to abuse that to kill them or use it to apply more conditions onto Vale Guardian using epi bouncing. Usually you don't kill them but hey more dps whilst you ignore them.
Blue Guardian[edit]
Blue Guardian is usually thought of as power damage. Anyone not going to Red Guardian comes to the blue pillar during split phases in the main arena.
Blue Guardian has a protection buff which stops you doing damage to him. It can be removed via usual boon removal, though is often taken care of by a chrono's auto attack. Ensure you have at least one form of boon removal in your squad that is going to the Blue Guardian.
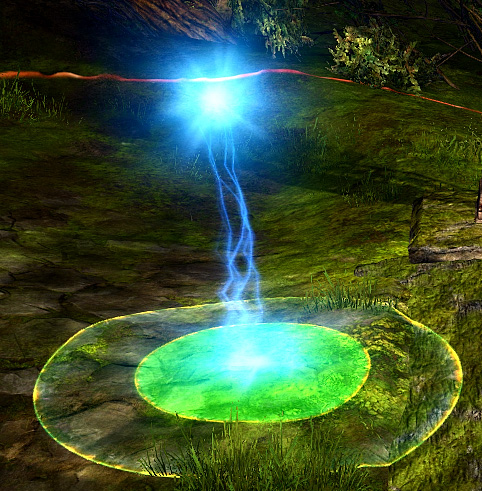
Blue Guardian's main mechanic is that he creates green circles in the segment of the arena that the group is stood in. These circles lose their colour—once the colour is gone, they will deal damage of 80% of every squad member's health.
This can be prevented if 3 people are stood in the circle at that time. If you have lower than 80% hp, you'll go into downed state. Most groups ignore the green circles and have their healers "outheal", which involves keeping the squad's hp above 80% and immediately healing the group back up after the damage spike. Bringing barrier to artificially increase the health bar helps a lot with the "outheal" strategy.
Green Guardian[edit]
Green Guardian is usually thought of as power damage. The druid (or someone else with at least 1,200 range) will attune to the blue area and then go and attack the Green Guardian to bring it over to Blue Guardian at the split phase in the main arena.
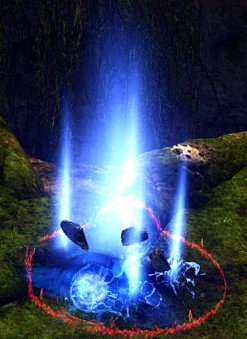
Green Guardian creates little blue circles at the feet of some players. These circles teleport players to random points around the arena. It could be really close or the absolute other side of the arena. The circles have a crackle noise when they're around and they explode after 2 seconds.
You can tell if you're in a circle by the yellow border around the edge of your screen. Teleport circles can be blocked or evaded or dodged, just don't dodge into a different blue circle. You can only block a single circle at a time with aegis, so if they're overlapping then aegis won't work. You have enough time to walk out of a circle you're stood in—just don't panic and side step it.
Phases 1 and 3—Vale Guardian[edit]
This will assume all the way through that you're doing side tanking as that's the most common tanking strategy.
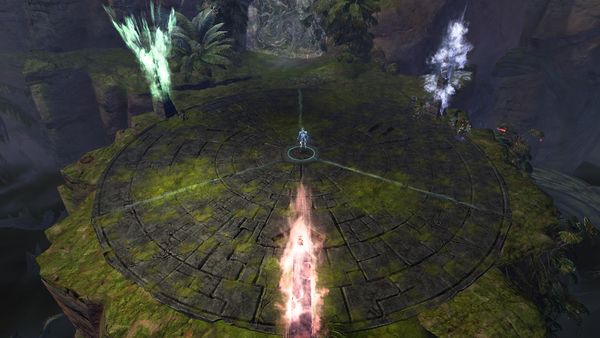
The platform is split into 3 sections. These are Red, Blue and Green sections. The centre of each section has a symbol in it which corresponds to the symbol that appears above your head when you attune to a section in the split phases. It's important to work out where the section edges are and which one you're in so you don't get the wrong marker.
You will start the main fight on the platform at the arrow marker. Arrow is placed halfway between the blue pillar and the red pillar but on the red section of the platform. When you come back for phase 3, you will also start at arrow.
The edge of the arena gets a wall around it shortly after the fight starts. If you are outside of this when the wall spawns, you will instantly die. It is possible to start on the arena and then dodge or walk outside of the wall accidentally (or pull Vale Guardian too far when tanking) before the wall appears and then die. You want to stand inside this black line (inside the ridge and then line):
Vale Guardian is basically all three mini boss guardians in one. He has some extra mechanics which you don't see in the three mini bosses but he also has all of theirs with a couple of slight tweaks.
Usual mini boss mechanics:
- Seekers—Vale Guardian will spawn 3 of these at once around the middle and they will travel towards the group.
- Green circles—During the Vale Guardian phases, these require 4 people not 3. You can ignore them if you're doing the "outheal" strategy. They will spawn in the section that Vale Guardian is stood in when he spawns them.
- Blue circles/teleports—These will happen on a regular basis and will function like the ones that Green Guardian places.
Other Vale Guardian mechanics:
- Breakbar—Vale Guardian throws magic orbs around him which will damage people in a small aoe where they land. To stop this, you have to break the defiance bar. It needs 2,000 cc. The breakbar stays up for 30 seconds if not broken. He will not move whilst channelling this skill so it is very important to break it quickly if he's standing in a place that you don't want him to be.
- Autos—Vale Guardian will punch in front of him. These should only hit the tank as everyone else should be behind him.
- Magic Aura—Vale Guardian and his mini bosses all have a magic aura which pulses damage. The mini boss ones hurt more if you aren't attuned to the colour of the guardian whose aura you're in, but it is constant.
- Sparkly floor (actually called Unstable Pylon)—Vale Guardian will turn one or two of the sections of the floor their relevant colour. If the floor is coloured, it hurts so you should stay off of it. In Phase 3, one section of the floor is sparkly at a time—stand on the side of arrow marker that isn't coloured. In Phase 5, two sections are sparkly at once—we'll deal with that later.
- 842525571996057661.jpg
Sparkly floor
- 842529670146949150.jpg
Breakbar/Magic Storm
Once you get to 66% (or 33% at the end of phase 3), Vale Guardian will become invulnerable and will run back to the centre and disappear. If there is a green circle up at this stage, stay together at arrow to heal up after the circle "explodes". It might be best to ensure that you're on the correct side of the section line during this so that you don't accidentally get the wrong attunement when the next phase starts.
Phases 2 and 4—Split phase[edit]
After Vale Guardian disappears, everyone in the arena will get a coloured symbol over their head. This corresponds to the section of the arena that you're stood in at the time the symbol appears. If you are a condi class and assigned to red, you will want a red symbol. Everyone else should get a blue symbol. These symbols make you take less damage from the corresponding guardian's aura. Without a related symbol, you will take a lot of damage each tick from the guardian aura.
Once they have attuned to blue, the druid (or other ranged class) should hit the Green Guardian to bring it to the Blue Guardian. These two are usually fought together. The Blue Guardian should be the priority as he creates the green circles. These circles must be stood in during this stage to protect the people who went to Red Guardian as they usually will not have a healer with them.
Once a guardian's health is 0%, they will gain a breakbar. They can still do their usual mechanics whilst this bar is up. Once the breakbar is broken, the guardian will die and any related mechanics will disappear. For example, if you break the Blue Guardian's breakbar and kill him, any green circles that are up will disappear and do no damage to the group.
During this phase the guardians act like they did in the pre-event and have the same mechanics.
During this phase, there will be white orbs floating about the arena. These are called Bullet Storm and will damage you for a small amount each if they hit you. They float in fairly straight lines so should be easy to avoid. Near the middle of the arena the paths are more likely to cross which makes them harder to avoid.
Once all three of the guardians have been killed, Vale Guardian will reappear in the centre of the arena. He is invulnerable for a short while after he appears so be aware that most skills won't hit him for that time.
Phase 5—Final phase[edit]
This phase is like phases 1 and 3, but with movement!
You usually start at circle marker. Circle marker is at the red/green section line on the red side and halfway between the edge and the centre of the arena.
Vale Guardian will follow the tank there and will cast blue circles and seekers and then quickly follow that with Magic Storm (his skill with a breakbar). You will want to break this as soon as you can to be able to start moving. Ideally you want to be on the green section before the green circle appears.
During the final phase, 2 of the sections of floor will be lit up at any given time. You want to keep moving Vale Guardian to the far side of the non sparkly floor so that you're next to the next section that will stop being sparkly. The floor moves clockwise so you will do too. Green and blue are the floors that start lit up, then blue and red etc.
You will want to take green circles where it is possible to do so during this phase as it significantly reduces pressure. You'll be running through seekers, trying to side step blue circles and be taking ticking damage from Vale Guardian's aura. Remember you need four people for the Vale Guardian green circles. If the green is on a sparkly floor, do not take it and instead stack up to help your healers.
Keep circling the arena until Vale Guardian is dead.
Tanking—side strategy[edit]
Most groups will tank at the side of the arena. This allows the tank to dodge backwards into the wall to avoid the blue circles and means that any class can tank Vale Guardian. The tanking spot for the first 66% of the fight (until after the 2nd split phase) is on the red side of the red/blue section divide. In phase 3, make sure to hop floors to keep off the sparkly one.
As the wall is unlikely to be up for a short while after the start of the fight, ensure you don't accidentally walk backwards out of the arena when Vale Guardian runs towards you. If you are the person in charge of starting the fight then don't run back to the tank spot too quickly. Let the wall appear as Vale Guardian is quite slow at running.
After the blue circles and the green circles Vale Guardian likes to punch you. Make sure your health is high enough or that you have a block ready to stop him instantly downing you. Even in high toughness gear, this can hit hard.
If you are tanking on a chronomancer, you can trait into inspiration (grandmaster trait 3) and bring a signet or two to make yourself invulnerable for the greens. This means you take no damage and are therefore healthy for when Vale Guardian punches you straight after. The timing is a little tricky—Signet of Inspiration is easier than Signet of the Ether as it has a shorter cast time. You want to cast SoI when there is barely any green left in the circle. For SotE it wants to be about 20-30% full.


